DMD – Infinite Zoom – Evaluation
It seems as though it is no more than five minutes ago since I was writing the Rationale for this module. This is partly due to the fact that I have been working practically non-stop since the beginning of October; the other reason that the past 10 weeks has flown by is because I have thoroughly enjoyed the work I have been doing for this brief. This is most probably because of the nature of the project; I find that self-directed briefs make me more interested and enthusiastic in my approach to the project. The main worry for this project was one that has existed from day one, knowing that the brief I had set myself was a little over-ambitious, like much of the work I attempted in the foundation years of the course.
The best way of evaluating the outcome of this brief I have figured to be comparing the finished product to the original suggested idea, looking at how much they differ from each other and whether the outcomes have been met as suggested. However this is only a small part of the module, the other side draws upon a well documented body of work, which shows further development of skills learned in the previous two years of the course. I am fairly confident this project has been well researched and each stage of the development has been documented correctly. Personally I believe the finished piece could not have been finished to higher standard within the time constraints of this project. As for the research and development side of things, I feel a vast improvement has been made on previous years. This is an area of work that I have struggled with from the beginning of this course.
I was reminded the other day that this is a thirty credit module therefore around sixty hours of work should be put into it, this made me laugh as I can honestly say I have put at least double that amount of time in. I'm not sure whether I’ve been extremely dedicated to this project or a fool for putting too much effort in. I suppose we'll see when I get my grade for this.
I've chosen to specialize within visual effects for film, however this is still far too broad for industry. I need to decide whether I am looking at going into editing, compositing, modelling, texturing, lighting or render. Although I enjoyed playing all these roles as it gave me ultimate control of the content produced, on the other hand this limits the amount of work I am able to produce and to what level of quality is achievable.
Although I am fairly satisfied with the result of this project, the initial photo-realistic style I was originally aiming for was unachievable working as a one-man band. As Annabeth suggested in a recent Crit, this is a hundred and fifty-man job, or a two-year project working alone.
I think it goes without saying that in this area of work, a specialism is much needed.
The specialism’s in which I worked on this Infinite Zoom production are as follows;
Writer
Director
Producer
Director of Visual Effects
Producer of Visual Effects
Lighting Technician
Modeller
Story boarder
Animator
Render
Researcher
Editor
Track operator
Compositor
I think it's impossible to have a professional understanding of each of these individual areas as they are so vastly different but yet depend on each other so critically that if one of the jobs isn't done to perfection then the whole thing begins to fall apart and look shoddy.
I've decided from this project that I will never take on this many roles in a project again, it is far to stressful and tiresome and after all it much better to get someone who's exactly what they're to do it than trying to do everything at once and doing a crappy job of it just to get your name on the credits a few more times than anyone else.
Apart from struggling with the amount of roles I have taken on in this project, it has helped me gain a better understanding of how a film crew works, everyone does there own little bit to get the best results. It has also given me one last chance to explore some possible future career paths, so in that sense this project has been a vital step in me reaching a set career path.
During this project there are a few areas of which stuck out to me the most in terms of being a possible future career path. I enjoyed writing this possibly the most as I had a vision in my minds eye of how I wanted this to look and I felt that getting the idea down on paper was the biggest step in the whole project, from visualizing to realizing is the most satisfying thing.
From here I would prefer to work with a storyboard artist, it takes me a lifetime to draw anything at all and even when I do manage something my drawings are very stiff and rigid.
Converting the storyboard into an animatic, well that's easy enough however I would soon get board of doing that all the time.
Director or Producer; to be honest I can't organize myself nevermind others to which everyone relies on, not for me.
I decided last year that I am not cameraman, track operator or lighting technician.
I'm not much of a modeller, although I made some basic models for this project, I couldn't see myself getting into modelling.
I struggled with animating even simple camera paths for this project; this is not an area I would like to be in full-time employment.
I enjoyed producing visual effects both in Maya and After Effects, I guess it's a kind problem-solving thing combined with seeing the ideas materialize, which I like about this.
Director of visual effects, I enjoyed this quite a lot, having a shot or two which I didn't have time to produce, explaining it someone else who is more specialist in that particular area rather than struggling on with it myself. Ok so this is a senior position, I have decided to set it as my 10-year goal, after all what's the point in aiming if you don't aim high?
Finally, editing and compositing, these are two areas I got my kicks out of in the second year, editing is not particularly my cup of tea plus there is probably a million people out there who could do it better than me. As for compositing, well I can quite happily sit at computer for hours on end, editing frame until it's right. I really enjoy seeing the bits of a puzzle coming together especially when I'm doing it.
So from this project I learnt the importance of specialism, plus I have managed to narrow my possible career paths down to just a few;
Writing
Compositing
Visual Effects Production/Direction
By the end of the final major project I aim to choose one of the above as my career path, I have plans to write a short/feature length film in which I aim to involve much of the 3rd years, assigning them places according to there chosen specialist paths. I'm sick of being a jack-of-all-trades, master of none.
Thursday, 17 December 2009
Infinite Zoom - Needs Polish - Development
This is the first cut for my Infinite Zoom project, as you can see it is a bit sketchy there are a few scenes which needs tidying up. Twixtor is needed to help give motion picture a smoother flow and more intersting flow.
Wednesday, 16 December 2009
Maya Atom Test - Development
This is a quick atom test, ok so it's a bit basic but that's what tests are for.
Space Travel and Earth Zoom Test - Development
This solar system motion camera path was render for last thursdays crit, the starry background has been poorly composited in After Effects. The motion tracking didn't work to good, as you will notice the sun seems to jerk about all over the place.
I render this in two parts as the motion path was too tight when paning around the Earth which looked rather shoddy so I made a seperate path for the Earth Pan.
The second part of this video is the Earth Zoom made a while back. As you can see the frames need to be blended much better as it is clear where the images have been stuck together
From the Eye to the Atom - Development
This short visual effects clip shows the retina, optic nerve, synapses, DNA and atom all edit together. All five scene have been created in Maya and composited in After Effects. This took around 20 hours to create a 20 second long clip, it looks pretty nifty but it's not exactly a James Cameron masterpiece.
I knew this project was a bit over ambitious from the start, as my tutor Annabeth said; this would be two year project to complete as I originally had in mind or I would require a crew of 150 people to achieve a photo-realistic look throughout.
I heard recently that it took 2000 man hours to produce a 1 sec clip for James Cameron's recent blockbuster 'Avatar.'
Tuesday, 15 December 2009
DNA - Maya - Development


 Here you can see I've simply duplicated and rotate the poly cylinders and sphere to fit on the helix, once a semi-circular group has been made they can be grouped and duplicated then moved down the helix.
I've simply coloured my dna strand with a green/blue and applied a 3D bump map. I've made a similar shader for the spheres but added transparency.
And some directional lights
Monday, 14 December 2009
First Scene Visuals and Typing Fixed - Development
This is an update on the previous post, all the issues commented on in the previous post have been amended. Unfortunately I have noticed an inconsistency in the typing, the text has disappeared from the screen without the actor deleting it, this must also be amended for the final video.
First Scene Visuals and Typing Test - Development
This is the first scene of ny Infinite zoom video, it was filmed with a blank screen so the footage you see on the screen was captured using screenflow and composited in afterwards, this is why the footage on the screen doesn't apear attacted the screen, therefore when the screen shakes the fotage doesn't. This can be easily sorted out using motion tracking.
It also has the visuals from itunes edited on, I used the bezierwarp to give it perspective, a mask to soften the edges and hue and saturation to change the colours. The second to last shot jumps slightly, but this can be easily sorted out. The zoom into the eye isn't too smooth so i'll have to edit this also.
Is James Cameron's Avatar 'the future of movies'? - Research
James Cameron's Titanic was the biggest hit in history - but Avatar and its 3-D technology could be 'the future of the movies'. No pressure, then, says William Langley.
http://www.telegraph.co.uk/culture/film/6797862/Is-James-Camerons-Avatar-the-future-of-movies.htmlDNA - Maya - Development


Sunday, 13 December 2009
The Importance of Not Becoming a Jack of All Trades
I think it goes without saying that in this area of work, a specialism is much needed. The has been outline no more so than in this project I am currently trying to fulfill.
My jobs in this Infinite Zoom production are as follows;
Writer
Director
Producer
Director of Visual Effects
Producer of Visual Effects
Lighting Technician
Modeler
Storyboarder
Animator
Render
Researcher
Editor
Track operator
Compositor
I think it's impossible to have a proffessional understanding of each of these individual areas as they are so vastly different but yet depend on each other so critically that if one of the jobs isn't done to perfection then the whole thing begins to fall apart and look shoddy.
I've decided from this project that I will never take on this many roles in a project again, it is far to stressful and tiresum and after all it much better to get someone who's exactly what they're to do it than trying to do everything at once and doing a crappy job of it just to get your name on the credits a few more times than anyone else.
Apart from getting blagged about the amount of roles I have taken on in this project, it has helped me gain a better understanding of how a film crew works, everyone does there own little bit to get the best results. It has also given me one last chance to explore some possible future career paths, so in that sense this project has been a vital step in me reaching a set career path.
During this project there are a few areas of which stuck out to me the most in terms of being a possible future career path. I enjoyed writing this possibly the most as I had a vision in my minds eye of how I wanted this to look and I felt that getting the idea down on paper was the biggest step in the whole project, from visualizing to realizing is the most satisfying thing.
From here I would prefer to work with a storyboard artist, it takes me a lifetime to draw anything at all and even when I do manage something my drawings are very stiff and rigid.
Converting the storyboard into an animatic, well that's easy enough however I would soon get board of doing that all the time.
Director or Producer; to be honest I can't organize myself nevermind others to which everyone relies on, not for me.
I decided last year that I am not camera man, track operator or lighting technician.
I'm not much of a modeler, although I made some basic models for this project, I couldn't see myself getting into modelling.
I struggled with animating even simple camera paths for this project, this is not an area I would like to be in full-time employment.
I enjoyed producing visual effects both in Maya and After Effects, I guess it's a kind problem solving thing combined with seeing the ideas materialize, which I like about this.
Director of visual effects, I enjoyed this quite a lot, having a shot or two which I didn't have time to produce, explaining it someone else who is more specialist in that particular area rather than struggling on with it myself. Ok so this is a senior position, I have decided to set it as my 10 year goal, after all what's the point in aiming if you don't aim high?
Finally, editing and compositing, these are two areas I got my kicks out of in the second year, editing is not particularly my cup of tea plus there is probably a million people out there who could do it better than me. As for compositing, well I can quite happily sit at computer for hours on end, editing frame frame until it's right. I really enjoy seeing the bits of a puzzle coming together especially when I'm doing it.
So from this project I learnt the importance of specialism, plus I have managed to narrow my possible career paths down to just a few;
Writing
Compositing
Visual Effects Production/Direction
By the end of the final major project I aim to choose one of the above as my career path, I have plans to write a short/feature length film in which I aim to involve much of the 3rd years, assiging them places according to there chosen specialist paths. I'm sick of being a jack of all trades, master of none.
Saturday, 12 December 2009
Finished Synapses - Maya - Development
Alex Moody modelled these synapses for me, shortly after our tutor Matt introduced us both to mental ray skin textures adding a 3D bump map called a brownian and sss_script for the transparency helps make the models look more organic. I then duplicated these and created a camera path through the synapses.
Friday, 11 December 2009
Maya Galaxies - Development
These Galaxies were made in Maya, simply by aquiring a hi-res image of a Galaxy on line, taking it into Photoshop and creating a transparency map by converting a duplicate of the original image to grey scale. In these image are assigned to the colour and transparency nodes of a new lambert, then this lambert is assigned to a polyplane.
Once I was happy with one Galaxy I duplicated it six times, back in Photoshop I adjusted the Hue of the original and save it as something diferent, I did this a further 5 times. In Maya I duplicated the shader network 5 dimes and applied a different coloured galaxy to each polyplane before randomizing size and position.
I then duplicated my galaxies many times and made a motion path run through them, the above video is the result after rendering a Tiff sequence.
Maya - Optic Nerve - Development

This use the same mental ray shader network as the synapse but I've adjust the value of the 3D bump Map
Thursday, 10 December 2009
Audio Track - Done
We recorded the bassline this evening, despite a few set backs in the reoring studio we managed to find ways around them soon enough. Chris did an excellent job of writing a bassline for this piece, it fits the song perfectly and has filled it out nicely.
I we still have to inform royalty collection agencies and copyright the material it can not be posted on blogger straight away.
Thanks to everyone who's put time in to creating this track it sounds epic.
I we still have to inform royalty collection agencies and copyright the material it can not be posted on blogger straight away.
Thanks to everyone who's put time in to creating this track it sounds epic.
Inside the Retina - Maya - Development
This Retina was made in Maya by creating a polysphere deleting half of it and assigning an image of a hi-res retina to it. The I applied some basic camera movement and rendered it out. I'm going to ad some particle in After Effects so it looks more interesting
Screen Capture - Development
This footage was caputed using screenflow, it is the visualization from itunes which has been composited on to a blank screen of the footage filmed for the Infinite Zoom project. This was done by using the colour key in After Effects to remove the black background. The bezierwarp tool in an atempt to add perspective and masked with a high feather count to soften the edges.
By the way the video has a black screen for the first 2:41 mins so you might want to move it along to this point to view the footage.
Tuesday, 8 December 2009
Earth Animation Test Render - Development
This is another test render of my Maya Earth, this includes the Sun, the Moon and a satellite to make it more interesting. The camera animation doesn't run to smoothly and there are no stars in the background. Now it's time to do some After Effects work to get it look better.
Sunday, 6 December 2009
Hubble Deep Field: The Most Imp. Image Ever Taken (Redux) - Research
This is apparently the most important image ever taken so I had to post something about it. It is rather interesting and some of the poorly composited nebula's show that can be achieved easily by even by amateurs.
Milky Way in 3D - Research
I have chosen to post this purely because it has nearly 840,000 views and a 4 out of 5 rating, people who rate stuff like this on YouTube are morons. Throughout my research I've come across loads of crap like this, it seems to be all over the Internet. It makes me wonder how this was made, by guess is celestialmotherlode had a part to play in supplying the entire project file.
Moody's Synapses - Development

I'm not much of a modeller myself, my freind Alex Moody knows what he's doing so I asked him to model some synapses for me as it would take me a long time. This video isn't tracked very well but you get the idea.
Friday, 4 December 2009
Development - Alpha Masks in Maya using Photoshop Texture
It's about 9 months ago that I last put this technique to use so it was a good idea to have a little refresher. This demo will show how to add an alpha channel onto an image in Photoshop to mask (remove) any unwanted area on a file texture.
This was the technique I used for the D&AD Black Hole Brief last year. I tried this but it didn't get the desired result, the image looked all scatty around the edges where the black fades into light.
I decided to make a transparency map by turning the image grey scale and mapping it to the transparency node in Maya. Apply the colour and transparency files to a new lambert the assigning the lambert materiel to a polyplane gave me a satisfiable result so I duplicated the polyplanes. Back in photoshop I varied the colour by adjusting the hue and saturation, saving several colour variants.
Assigning different coloured galaxies to polyplanes and randomizing the size and position made my galaxies look as though they are within a Universe. The bottom image shows the transparency against a white background.


Thursday, 3 December 2009
Research - Earth Zoom
There are several points in this visual effects piece that sell the photo-realism factor here, notice the birds a couple of seconds in, the cloud level, the camera tilt from vertical about 12 seconds in and the satellite. The sun doesn't look to great neither does the opening image, because of this I feel youtube viewers have been a bit too generous with the 5 out 5 rating.
Wednesday, 2 December 2009
Rymdreglage - 8-bit trip
This is completely irreleavent to the work I'm doing, I was just impressed that it took 1500 hours of moving legobricks and take photos of them to make this music video.
Tuesday, 1 December 2009
The universe - How big are you? - Research
This video is rather interesting, although the aesthetically value of this piece differs vastly from what I am trying to create, the relevance lies within gaining an understanding of the scale I will be working to when flying through the Universe.
Sunday, 29 November 2009
Audio Track - Got Vocals - Bass on its Way - Development
We've got the vocals now and they have been added to the mix, it's sounding pretty good already. It's going to sound quality with a funky bassline behind it. We also have a date booked for the recoprding studio, the earliest we could get is Thursday 10th December. Although this is cutting it a bit fine as long as everything goes to plan there won't be any problems.
Kate has also informed me that one of her music production tutors, Marlon who has recently mixed and mastered tunes for 'Jamiroquai' has asked her if she wants him to do a mix for this track. He has already said he wants it to be mainly her input but with his finish, plus Marlon knows that this track is being produced in conjunction with a visual effects motion picture and wants to use the video as a reference to structure the song.
Because of this I need to get the video finished as much as possible by the time we have all the raw audio so not to keep him waiting.
Photo-realistic Earth - Maya Tutorial - Part 1 - The Earth
I spent countless hours trawling the Internet for a photo-realistic Earth tutorial in Maya. I managed to find many in 3DS Max, Cinema 4D and After Effects but nothing for Maya. My tutor decipher a tutorial for 3DS Max into Maya language, he later showed me how he made it, afterwards I reproduced one of my own form memory, adding some of my own content whilst I went along. I then went on to document the processes in a 21 step guide Maya tutorial.
I will admit that there is proberly a few improvements that could me made to this tutorial and the end product so if you've got any thoughts on this feel free to comment. By the way, I am a bit of an amateur and this is my first tutorial so excuse my lack of technical terminology.
A quick word of advice to any newbies in Maya, make sure you edit all the names of polygon shapes and nodes as you go, otherwise things will soon get messy.
If you get stuck at any point in this tutorial comment on one of the posts explaining the problem and leaving a point of contact, and I will get back to you asap.
For this Project you will need an Earth Colour Map, an Earth Night Map, a Cloud Transparency Map, a Specular Map and a Bump Map. These can all be found and downloaded by clicking this link; http://planetpixelemporium.com/earth.html
If you want some higher res maps, check out Nasa's Blue marble/visible earth collection
1. Start by creating a polygon primitives - sphere, adjust the subdivision to 50 and scale by 250.
2. Apply a new lambert to this sphere.
3. Add a directional light, under attributes uncheck emmit specular and rename diffuse_directional_light. Duplicate and do the opposite to step three, name this specular_directional_light.
4. Now apply a ramp shader to your earth_shader. Use a bright and a dark colour to replicate how the light falls on the sphere. Set to V Ramp and facing angle.
5. Once the ramp shader matches the directional light, replace the day map file to lighter colour and the same with the night to the dark.
6. Create a blend colour node from colour utilities in the hypershade, plug the day map into one colour and blue as the other, set the blender to 0.9.
7. Apply the blend colour to the specular glow of the earth_shader.
8. Place a new file call it specular_file, then plug the specular map into the colour and plug the specular_file.outcolour to the earth_shader.specularcolour.
9. Create a bump map using the bump file plug into the bump map on the earth_shader. Set the Bump value to 0.1.
10. Attach the Luminance.outvalue to the earth_shader.glowintensity.
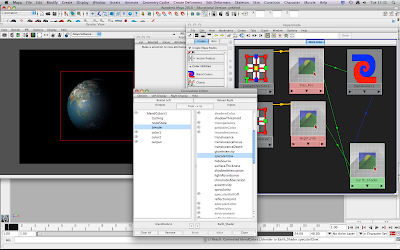
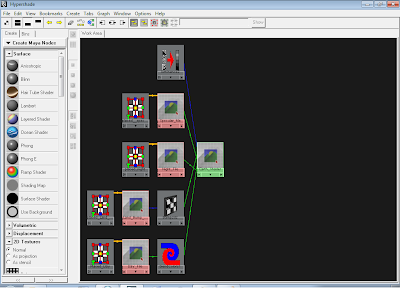
The last image shows how your Earth Graph Network in the Hypershade should be looking.
I will admit that there is proberly a few improvements that could me made to this tutorial and the end product so if you've got any thoughts on this feel free to comment. By the way, I am a bit of an amateur and this is my first tutorial so excuse my lack of technical terminology.
A quick word of advice to any newbies in Maya, make sure you edit all the names of polygon shapes and nodes as you go, otherwise things will soon get messy.
If you get stuck at any point in this tutorial comment on one of the posts explaining the problem and leaving a point of contact, and I will get back to you asap.
For this Project you will need an Earth Colour Map, an Earth Night Map, a Cloud Transparency Map, a Specular Map and a Bump Map. These can all be found and downloaded by clicking this link; http://planetpixelemporium.com/earth.html
If you want some higher res maps, check out Nasa's Blue marble/visible earth collection
1. Start by creating a polygon primitives - sphere, adjust the subdivision to 50 and scale by 250.
2. Apply a new lambert to this sphere.
3. Add a directional light, under attributes uncheck emmit specular and rename diffuse_directional_light. Duplicate and do the opposite to step three, name this specular_directional_light.
4. Now apply a ramp shader to your earth_shader. Use a bright and a dark colour to replicate how the light falls on the sphere. Set to V Ramp and facing angle.
5. Once the ramp shader matches the directional light, replace the day map file to lighter colour and the same with the night to the dark.
6. Create a blend colour node from colour utilities in the hypershade, plug the day map into one colour and blue as the other, set the blender to 0.9.
7. Apply the blend colour to the specular glow of the earth_shader.
8. Place a new file call it specular_file, then plug the specular map into the colour and plug the specular_file.outcolour to the earth_shader.specularcolour.
9. Create a bump map using the bump file plug into the bump map on the earth_shader. Set the Bump value to 0.1.
10. Attach the Luminance.outvalue to the earth_shader.glowintensity.
The last image shows how your Earth Graph Network in the Hypershade should be looking.


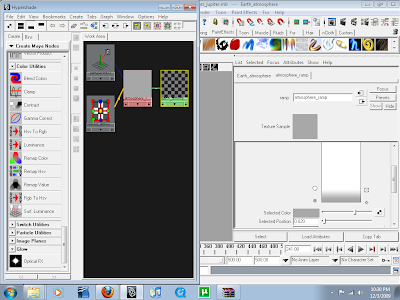
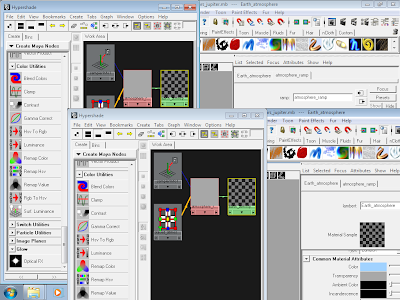
Photo-realistic Earth - Maya Tutorial - Part 2 - Clouds & Atmosphere
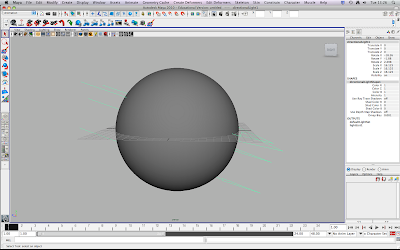
11.Duplicate your polygon sphere (earth) and rename it clouds, enlarge by 0.5. Create a lambert, a bump map and an image file. Plug the cloud transparency map into the image file and the image file into the lambert transparency. Change the bump map settings so it looks like a fluffy cloud and plug the bump map into the lambert bump. Your clouds should no be looking pretty cloud like.
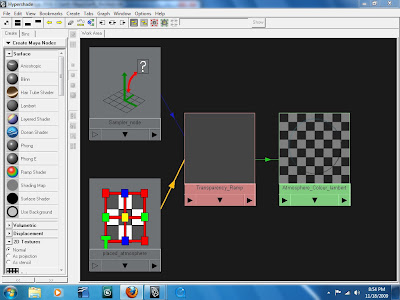
12.Now it's time to create the atmosphere, start by duplicating the clouds polygon sphere and expand by 1, e atmosphere_out. For the outer atmosphere you will need a sampler info node, ramp and a lambert. Plug the sampler info node facing ratio into the ramp V.coord within UV.coord. Set the Ramp to grey and white as in the third picture down. This acts as transparency (black would be loads of colour, white is none.) Change the colour of the lambert to a light blue and diffuse to 0.8 and glow intensity to 0.5 under special effects.
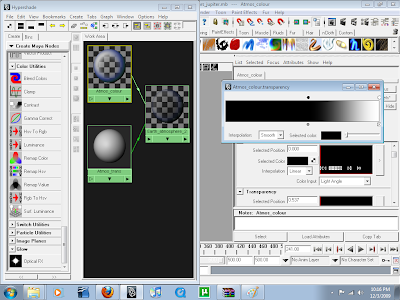
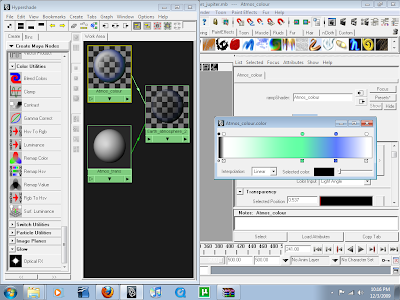
13.Duplicate the atmosphere_out rename atmosphere_in, make two ramp shaders and a lambert rename one ramp shader atmos_colour and the atmos_transparency., rename the lambert atmosphere_in_shader. Plug the atmos_colour in to the the lambert colur and the the atmos_trans into the transparency. Adjust the colour and the transparency as shown in the bottom two pictures.

12.Now it's time to create the atmosphere, start by duplicating the clouds polygon sphere and expand by 1, e atmosphere_out. For the outer atmosphere you will need a sampler info node, ramp and a lambert. Plug the sampler info node facing ratio into the ramp V.coord within UV.coord. Set the Ramp to grey and white as in the third picture down. This acts as transparency (black would be loads of colour, white is none.) Change the colour of the lambert to a light blue and diffuse to 0.8 and glow intensity to 0.5 under special effects.
13.Duplicate the atmosphere_out rename atmosphere_in, make two ramp shaders and a lambert rename one ramp shader atmos_colour and the atmos_transparency., rename the lambert atmosphere_in_shader. Plug the atmos_colour in to the the lambert colur and the the atmos_trans into the transparency. Adjust the colour and the transparency as shown in the bottom two pictures.


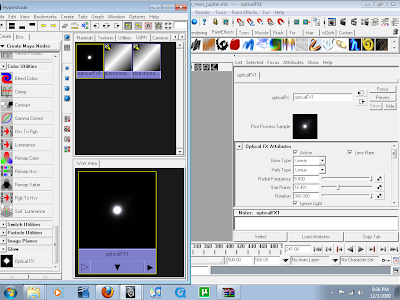
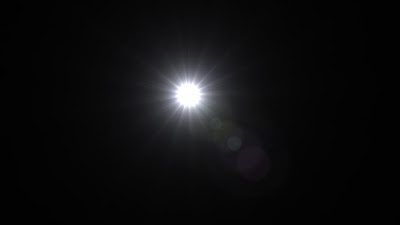
Photo-realistic Earth - Maya Tutorial - Part 3 - The Sun
By now your Earth should be looking pretty realistic, with depth where the mountain are, reflectivity on the water and not on the land, some specular glow and a smooth fade from night to day.
14.Now we're going to move on to creating the sun, for this you will need a volume light, attach an opiticalFX node and play about the glow, halo and lens flare attributes until satisfied. This is a case of trial and error, it depends how you want your sun to look.
I've used R-1.00 G-0.980 B-0.973 for the glow colour.
R-0.876 G-0.891 B-1.00 for the halo colour.
R-0.748 G-1.00 B-0.522 for the lens flare colour.
15. Delete the volume light leaving the optical effects, the volume light affects the opticalFX looking quite nasty, only do this when you are finished though having animated your camera otherwise you won't know where the sun is.


Photo-realistic Earth - Maya Tutorial - Part 4 - The Moon/satellite


16.The moon is nice and simple to create, all you need is a polygon sphere 1/50th the size of your earth. Import you image files for your moon colour and bump map, create a new lambert and plug the colour file into the colour and the bump map into the bump. Assign this texture to your sphere and rename everything accordingly. Now render a preview with both the earth and moon in shot and it should be looking something like the first picture on this post.
17.You can also choose to add some extra features to help make your Earth more interesting. I found this Atlantis MIR Link-up model at ://www.celestiamotherlode.net/catalog/satellites.php It was in a 3ds format so I had to convert it using Polytrans. You can buy much better ones if you got a budget to fit or better still if you got more time on your hands you can model one yourself.
I decided that I'm not a fan of the shuttle so I deleted it along with a few features that didn't look to great.
Photo-realistic Earth - Maya Tutorial - Part 5 - Animating/Rendering


18.To animate the satellite so it orbits your Earth, create a nurbs circle, expand it to a realistic distance from the Earth. Now parent the satellite to the nurbs circle by selecting them both and choosing edit>parent. With the nurbs circle as the parent selected click 's' this will save a point on the timeline, now move a about 200 places down the timeline, rotate the nurbs circles so the satellite is out of sight behing your and click 's' again. Now play through the timeline and your satellite should moving in a smooth orbit around the Earth.
19.Now create a new camera by slecting create>cameras>camera. Under camera attributes slect the far clip plane and set to 100,000 and the film gate 35mm full aperture. Animating the camera is similar to the satellite, just simply move the camera to what you want to view and tap 's' on the timeline for each key shot, Maya will work out the tween frames although this automatic tweening can give you some sketchy results so playback whats just been animated from one key shot to the next.
20.Finally when your happy with your animation you are now ready to render. Go to the top right of you Maya screen and click the image of a clapper with two black dots on the left hand side of it, this will open up your render settings. Select the format you wish to render in Tiff is what you need for this. Scroll down and select the frame range changing the start and end frames to match what you've animated on the timeline. Moving down again to Renderable Cameras change to camera1 or whatever camera you've animated, select the Alpha Channel (Mask) as this will be needed to allow you to put stars behind your planets in After Effects. Set the image size to HD 1080 in the presets , in render options make sure default is not enabled. Select the Maya Software tab next to common and then choose anti-aliasing quality, change the Quality setting to production quality and the Edge anti-aliasing to highest quality. Finally scroll down to the raytracing quality, tick raytracing setting the top three values to 10.
21.Ok so now you can render this out and see the results of your hard work, select render>batch render. When its done import this into After Effects as an image sequence and render out in your chosen format. I've added a starry background in mine and tracked it to the movement of the camera. I created this using paint effects>galaxies in Maya, rendering this out as a 4k square and then edited it photoshop to make them more realistic.
Friday, 27 November 2009
Maya Earth Test Render - Development
This video shows a quick test render of my Maya 3D earth, moon and sun. The star background was made in Maya using Galaxy Paint Effects then edited in Photoshop. I took this in to After Effects and quickly composited it with the Maya tiff sequence.
From this quick render there are a few clear issues, the star background is far to bright and don't move properly when the Earth rotates, the clouds are lit on the dark side of the Earth, the sun is not realistic enough and the cloud is far too high.
The second part of this moving image sequence is edited together with the Earth Zoom I previously created, this is joined by using fractal noise set to look cloud like.
Final Scene - Development
This is the final scene for the Infinite Zoom project, shot using an XD-Cam, a track and a crane. There was a lot of post production work that went into this one shot to get it as smooth and dramatic. This shot was stabilized using motion tracker in After Effects, scale to give the zoom out. The speed was adjusted using twixter
Updated Animatic - Development
This is an updated animatic, using the live footage which replaces the animated drawings seen in the previous animatic. This was shot using an XD-Cam with assistance from a track and crane. It also has the earth zoom I created in After Effects
Tuesday, 24 November 2009
Post Production Techniques - After Effects
This shot nearly had to be compromised, thanks to some motion tracking image stabilization techniques in After Effects this shot is much smoother and can now be used. Filmed using a track and crane at college, the pivot on the crane was designed only for framing the shot shot it doesn't pivot smoothly, tracking whilst lowering the camera angle at the same time was a nightmare. After getting as smooth as we could we decided to film it without the pivot, however this was not good enough.
I decided to take the footage into After Effects and see what stabilize motion could do for this footage, it was much better after apply 4 trackers to the shakey footage.
Messing about with speed and motion blur in twixter makes any remaining bumps less obvious, however this needs to be completely smooth. One more run through motion tracker, this time using scale aswell as position, adding a feathered mask to smooth off the edges.
Twixter will be applied to this fully smooth cut later to make it more dramatic.
Thursday, 19 November 2009
The Shoot


There wasn't a lot of time to be messing around taking pictures today, having a three hour window in which to set up, film and put everything back doesn't leave much spare time. The first hour was spent putting the seating away and setting up the shot, getting the lighting right etc.
The next hour was spent trying to film the shot using the crane and track whilst pivoting the camera from a birdseye view to standard. The reason this took so long is due to the pivot is meant for framing the shot, therefore it doesn't pivot smoothly. Tracking and lowering at the same time made it even more difficult to get the smooth cork-screw motion shot originally proposed.
In the end we decided to compromise the shot and forget about the pivot, this is a shame as the seamless camera movement will be lost right at the end. The final our was spent getting the point of view shots and the close ups. These were relatively straight forward, meaning we were able to get out just after four, as originally planned.
I would like to finish by saying a big big thanks to Tom Harrison and Matthew Burton for setting up and filming with me, Marcus (Adam) Sawyer for turning up at short notice and performing better than anticipated. Finally thanks to Mike Smith and Lynsey Oates for making sure my booking wasn't ignored by Business and Enterprise without all the people doing there bit on the day this shoot wouldn't have happened.
Monday, 16 November 2009
Audio Track - Development
We've found a female vocalist by the name of issi freeth-hale. She specializes in jazz and electronica and after hearing some of her work, I can safely say shes got the voice for the job.
Unfortunately due to copyright I can not post her work or the development of the track on blogger until it has been verified by PPL, PRS and MCPRS.
Unfortunately due to copyright I can not post her work or the development of the track on blogger until it has been verified by PPL, PRS and MCPRS.
Sunday, 15 November 2009
Galaxy Paint Effects Maya


These galaxy/star environments are paint effects produced as easily as clicking a button and painting freely.
Unfortunately I can't find a way of combinding these with other content; planets, asteroids, nebulai etc.
When I figure this out I'm away, as of yet still no joy, fed up of trawling internet tutorials for a method of combinding this content.
Thursday, 12 November 2009
Maya - Lighting Test - Development
This video shows a quick render to see how the lighting optical FX in Maya would react to camera movement.
Animatic
This animatic is an update on the original moodboard movie, as I was unable to find footage for the start and end scenes I have used the sketches I did at the start of this project and animated them as the live footage will be. It was made over three weeks ago for a tutorial and has just been festering somewhere in my computer since then.
Saturday, 7 November 2009


Earth Zoom - Leeds
After following Andrew Krammer's video copilot tutorial, I decided to make an Earth Zoom that zooms into somewhere far superior than San Francisco. Produced in Full HD1080p. Images courtesy of google earth pro trial. This is the second to last scene of my DMD Visual Effects motion picture, it still needs some work but it shows development. Copyright all rights reserved.
Actor Post
The guy that was lined up to act for the opening and closing scenes of my DMD project has suddenly become Mr Uncontactable. I've been trying to get in touch with him for just short of a week to get him to confirm that Thursday 19th November is good for him. Originally he did say that any wed, thurs or fri is good for him. To be honest it's a bit of a pain but I would rather find out he is unreliable now rather than on the day of the shoot. Below you can see a post I've just put up on castingcallpro.com applying for an actor. 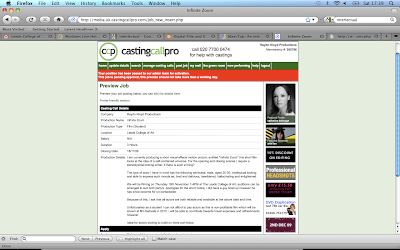

Monday, 2 November 2009
3D Earth - After Effects - Development
I created this 3D Earth by following a video copilot tutorial, it's alright but there are a few things which let it down, the lighting isn't too crisp, the shaded part isn't dark enough and although it's 3D the Earth still looks incredibly depthless. Because of this the quality isn't good enough for my Infinite Zoom project which attempts to create photo-realistic visual effects.
Sunday, 1 November 2009
Audio Track - Development
My partner, Kate is talented composer learning the skills and techniques of music techy at LCM. She obviously knows about what I am aiming to produce for this project as far as the visuals go, but when it comes to the audio I wouldn't know where to start. We have decided between us that a sort of downtempo/trip-hop genre would be best for this, taking influence from groups and producer like 'Massive Attack.' 'Air' and 'Blockhead.'
Within a week of us first discussing this she managed to get a spot on melody, using the malstrom synth in 'Reason' to create surreal sounds. Her mate at college tapped out a simple beat loop to which a heck of a lot of reverb was added, which has done it justice.
We've decided to get a female vocal artist for this track, Kate has put some recruitment posters up at the music college for anyone interested to get in touch. Apart from the vocals all the track is lacking is a nice bassline. Fortunately I have got a mate called Chris, he plays in a successful soul band and has been playing since before he could walk. He seems really excited about booking a recording studio out for a jam. Fingers crossed, it should all go to plan.
Wednesday, 28 October 2009
Altered States - Research
I was sent a link to this trailer by my tutor, it looks like a pretty crazy film, it would be interesting to watch when I have some spare time. The part of this trailer which is of use to me is 1:47 in, although it only last for a few seconds this shot attempts to show a camera traveling through the retina and down the optic nerve. The 1980 sci-fi horror directed by Ken Russel written by Paddy Chayefsky follows the exploration of William Hurt as Eddie Jessup, a scientist obsessed with discovering mankind's true role in the universe. He subjects himself to a series of mind bending experiments using a sensory-deprivation chamber and taking hallucinogenic drugs, Jessup hopes to explore different levels of human consciousness, but instead is devolved into an apelike monster.
Monday, 26 October 2009
Earth Zoom Test - Development
This earth zoom is the result of following Andrew Kramer, video copilots tutorial. Some important techniques and processes have been learnt whilst following this tutorial, now I need to a apply these techniques using imagery specific for my own work.
Saturday, 17 October 2009
Moodboard - Research

Here is a selection of some of the research resources I have used for this projects, taken from films and tutorials websites.
Google Earth Pro - Research


Fortunately for me 'Google Earth Pro' are giving out 7 day free trials, before I discovered this I was beginning to worry as 'Google Earth Standard' images are watermarked. Furthermore the settings in Google Earth Pro allow you to save '1080 x 1920' pixel images, nice.
The only downside to Google Earth is when zooming out past a certain point the grade changes completely and as you get really far out the image changes to a nasty looking CG Earth, at this point I've switched the image source to Microsoft Virtual Learning Earth.
Subscribe to:
Comments (Atom)